
[affiliate_login]
SpellBrite LED Signage System Instructions & Warnings
If you prefer a pdf version of these instructions, click here. Thank you for purchasing your new SPELLBRITE LED SIGNAGE SYSTEM. Make sure to read all instructions and warnings prior to installing your new sign. Please save your purchase receipt as it is required for warranty service. ! CAUTION
• Risk of electrical shock, fire or injury to persons.
• This product is intended for INDOOR USE ONLY and DRY LOCATIONS ONLY. Do not use in damp or wet locations. Do not install your product in an area that will exceed 120°F (48.9°C).
• Disconnect power before handling or cleaning.
• Do not use solvents or chemicals to clean your sign. Do not allow any liquid on or inside sign. To clean, wipe gently with soft, dry cloth.
• Use only SpellBrite-approved power sources with SpellBrite products.
• Only plug into a properly grounded outlet that meets all local and national electric codes.
• Do not use an AC extension cord or adapter.
• Operate at voltage equal to that on the product label.
• Do not use this sign with an external dimmer.
• Do not attempt to disassemble or service sign.
• Warning: Changes or modifications to this unit not expressly approved by the party responsible for compliance could void the user’s authority to operate the equipment.
• Your SpellBrite sign has a variable speed flashing option. Please check your local city and state ordinances for any regulations limiting or prohibiting the use of your sign’s flashing option.
• Each SpellBrite character draws a different amount of power (Amps). Please refer to our Amperage calculator at www.SpellBrite.com. SpellBrite offers multiple power supplies for different size signs.
• The SpellBrite Center Support Kit, part number SB-XCC-125A, is required for signs greater than 12 characters wide. Use one center support kit for signs 13-18 characters wide and an additional center support kit every additional 6 characters wide. For additional information, visit our website at www.SpellBrite.com.
NOTE: This equipment has been tested and found to comply with the limits for a Class B digital device, pursuant to Part 15 of the FCC Rules. These limits are designed to provide reasonable protection against harmful interference in a residential installation. This equipment generates, uses and can radiate radio frequency energy and, if not installed and used in accordance with the instructions, may cause harmful interference to radio communications. However, there is no guarantee that interference will not occur in a particular installation. If this equipment does cause harmful interference to radio or television reception, which can be determined by turning the equipment off and on, the user is encouraged to try to correct the interference by one or more of the following measures:
• Reorient or relocate the receiving antenna.
• Increase the separation between the equipment and receiver.
• Connect the equipment into an outlet on a circuit different from that to which the receiver is connected.
• Consult the dealer or an experienced radio/TV technician for help.
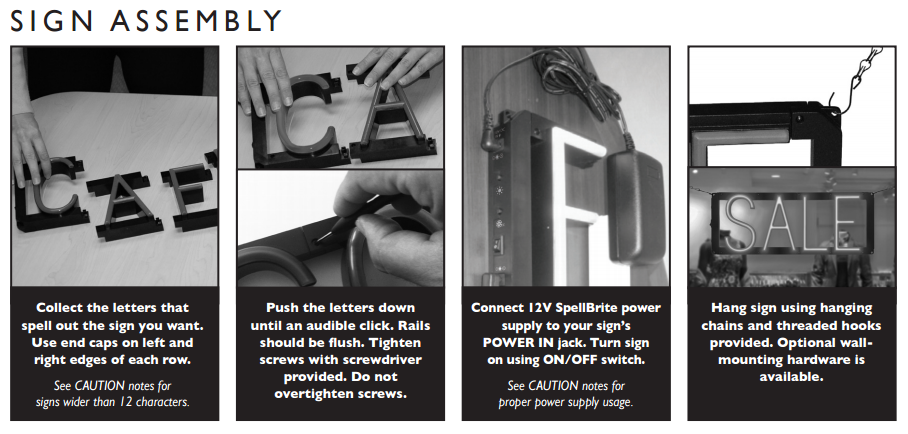
INSTALLATION
1. Select an indoor location to hang your SPELLBRITE sign.
2. After assembling your sign, remove the hanging chains and “S” hooks from the parts bag and attach to holes on the top of each end cap.
3. Select a surface that will fully support the sign and mount hooks securely to surface using appropriate hanging hardware.
4. If hanging in window, allow minimum 2” space between the front of the sign and the window.
5. Use only included power adapter and insert barrel plug into 12V DC power input on left end cap of sign.
6. Press ON/OFF switch to ON (I) position. Sign will illuminate.
7. To clean sign, unplug power and gently wipe surfaces with a soft, dry cloth.
CONTROL PANEL
1. Once assembled, slide ON/OFF switch on the left end cap to ON position. Your SPELLBRITE sign will illuminate.
2. To change the brightness of your sign, press the BRIGHTNESS button (button #1). There are six BRIGHTNESS choices.
3. To change the animation, press the ANIMATION button (button #2). There are eight shows including a static show.
4. Depressing both ANIMATION and BRIGHTNESS buttons at the same time will set the control board back to the default setting.
Default setting is Show #3 (Medium Pulse) and 100% brightness.
Build Your Sign & Get Instant Quote
R
W
B
G
RED
Please wait while your sign is created.
The necessary components are being added to complete your sign.
This may take a minute to process.
Do not browse away from this page.
Thank you!